A lovely new store has opened at Curborough Craft Centre
I am having difficulty loading the photos so will put a link to sites.
http://www.facebook.com/theflutterbyartboutique
http://www.flutterbyartboutique.com/
Showcasing the works of about 30 different crafters, plus daily classes.
Well worth a visit,
Tuesday, 30 October 2012
Friday, 19 October 2012
It's All Fiddle Fart: Jewelled Mirror
It's All Fiddle Fart: Jewelled Mirror
WOW!!! That's a real masterpiece.
Must go and sort my objet d'art (creative clutter)
Will let you know if I ever get round to making one.

Take a look at Helens blog, it is a real inspiration.
WOW!!! That's a real masterpiece.
Must go and sort my objet d'art (creative clutter)
Will let you know if I ever get round to making one.
Take a look at Helens blog, it is a real inspiration.
Friday, 20 July 2012
Have a Heart.
I have had a couple of days off this week, it was my birthday so I thought I would have a rest and re-charge my batteries.
Back working today, base coating wooden hearts of different sizes.
I always use cheap kitchen sponges to paint with. You can get a pack of 20 at £1 shops.cut each sponge in to 6 or 8 pieces then you can throw them away after use. I have watched people at classes wash them, They absorb that much paint it takes so long to get them clean and makes so much mess in the sink that I find it better to put them in the bin.
Using acrylic paint wipe a coat of paint on to heart, when dry dip a piece of sponge into colour paint of your choice, rub most of the paint off .
 Dab the sponge around the edge of heart.
I always use a Sakura.Micron Pigma pen to write a name or message. Dotting each letter with acrylic paint..
You can also use rubber stamps, the get well soon hearts in the picture were printed using a rubber stamp.
 I add the faux stitches , running stitch or blanket stitch with the pen.
Here are some ideas to use the hearts


Back working today, base coating wooden hearts of different sizes.
I always use cheap kitchen sponges to paint with. You can get a pack of 20 at £1 shops.cut each sponge in to 6 or 8 pieces then you can throw them away after use. I have watched people at classes wash them, They absorb that much paint it takes so long to get them clean and makes so much mess in the sink that I find it better to put them in the bin.
Using acrylic paint wipe a coat of paint on to heart, when dry dip a piece of sponge into colour paint of your choice, rub most of the paint off .

I always use a Sakura.Micron Pigma pen to write a name or message. Dotting each letter with acrylic paint..
You can also use rubber stamps, the get well soon hearts in the picture were printed using a rubber stamp.

Here are some ideas to use the hearts


 |
| Wedding favours |

Welly pegs


Wall hanger with stamped image.

Hanging heart with dotted flowers..
I love doing the dip dot flowers.
Sunday, 15 July 2012
Dog sitting
I have been quietly playing crafts on the dining room table today whilst I have been dog sitting
I did manage to make another small sewing doll decoration.
The workshops are sewing themes at the moment so I am trying out ideas recycled from my past projects.
I have been making the larger button dolls for the past 11 years but the suppliers of the wooden body cones have stopped making that size, we have lots of other sizes on our website.
The makers of the mini curl hair have now closed down, we have a small amount left.
I have tried other makes of doll hair but they are not as good.Will keep looking.
The small doll was made with a 5cm cone, was a bit fiddly so will not be making any more.
Have sat her on wooden block offcuts, painted and decorated with sewing theme buttons and embellishments

The little doll looks as though she has chickens feet and I did not realise until I had taken the photo that I had forgotten to add the faux stitches to the rest of the blocks.
Oh well a work in progress!!
Here is a picture of Freddie and Honey.

A quiet moment.

Charging round the garden.
Honey the basset hound comes to stay when my son and his wife go out.
Luckily the dogs get along great
Saturday, 14 July 2012
Sewing Room
I made these as samples for our sewing room theme workshops to be held at
Curborough Craft Centre
Sewing Room Wreath
The wreath is a 20cm wicker wreath which we will be listing on our website soon.
The dress form is cut from thick card using a Tim Holtz die. I put a piece of wood dowelling on the back to strengthen it. After edging the dress form with Tim holtz vintage photo distress ink I glued it to the wreath.
A simple fabric yoyo was added with a button in the centre. Yoyo's are circles of fabric with running stitches sewn around the edge and gathered up tightly. the button hides any rough edges. For a neater edge you can turn fabric edge in before sewing .
I then glued sewing themed buttons and embellishments on to the wreath.
a few inches of tape measure ribbon which I had tea dyed made a good hanger.

Sewing Room Door Hanger
I made the door hanger in the same theme as the wreath.
Using a plywood door hanger available from our store,I base coated it in antique white acrylic paint.
I then edged it with Distress ink. After edging the card dress form I glued it to the door hanger with tacky glue.A small fabric yoyo was added.Some tiny tiny buttons that I had were glued around the neck ,
The images were stamped on randomly using stamps that I had as a free gift with a copy of Crafts Beautiful magazine Not being the best stamper. I made a couple of smudges so I added a few sewing theme buttons to cover them up Using my favourite Sakura Micron Pigma Pen I wrote sewing room and finished the writing with dots on each letter. Then the hanger was finished off with faux stitches round the edges.

More packing to do, good thing I love buttons

Buttons, buttons, more buttons


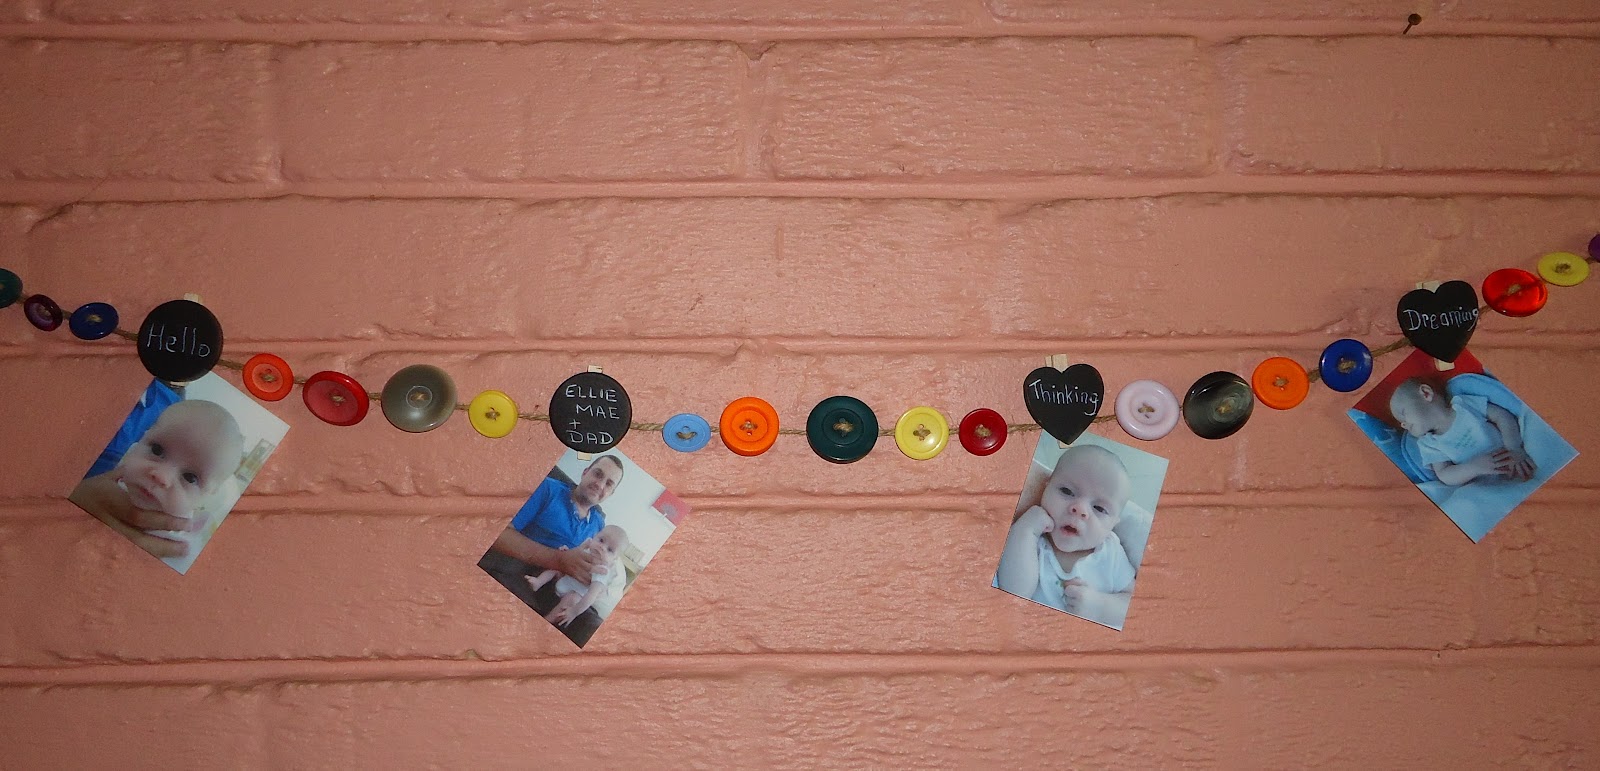
Then I decided to make a button garland
Next I made a button Pin board.
Using a cork pin board that i bought from a pound store, I painted the edges with acrylic paint, then
glued buttons on randomly with HiTack glue.
The message along the top was put on freehand with a Sakura Micron Pigma pen bought off Ebay. I dotted the ends of each letter with acrylic paint using a wooden barbecue skewer.
Using the HiTack glue again I glued a button on the end of the pins that were
supplied with the board.
Glue and buttons for sale in our store.
I did look at this and thought that I could have added shells in the place of the buttons to make a seaside theme, perhaps another day.
Boards that we have decorated are on sale at Curborough Craft Centre


Heart Chalkboards
With all the rain we are having it has given me time to stay inside and play in the workshop.
Have kept myself busy making more stocks of small chalkboard pegs. I use the 38mm wooden hearts and circles. spray them with chalkboard paint, I used to spend ages hand painting them, but have found the spray paint works out very reasonable when you are making a lot.
When paint is dry glue a 45mm peg on the back . I like to use HiTack glue
They make great clips,tags, hangers etc...
I also like to make larger heart signs, After painting drill holes and thread ribbon, wire or jute through and hang on wall, doors, cupboard knobs etc...
You can also make into fridge magnets by gluing a magnet on the back of heart.
I like to paint washing size pegs with polka dots and add a heart. Tie ribbon on to peg and tie chalk on other end.
These are all good sellers at craft fairs and school / church sales. they make lovely gifts for family and friends.
The finished chalkboards will be for sale at
The Arches Gift Shop.Curborough Craft Centre, Lichfield. Staffordshire WS13 8ES
Wooden hearts,circles and pegs available from our website www.creativecraftparts.co.uk![]()


Friday, 13 July 2012
Door Hangers for Baby

When they were dry I gave a light spray with Americana sealer. Tied ribbons on to pretty them up.
will be selling these at The Arches Gift Shop.
Curborough Craft Centre
Lichfield. WS13 8ES
Staffordshire.
Miss Buttons
Today I would like to show you Miss Buttons....my button jar
![]() I painted a large wooden head ball with acrylic flesh coloured paint,it dries very quickly and i dip dotted the eyes using the handle end of a paintbrush dipped into black paint .When the black was dry I dipped a thinner paintbrush handle into white paint and highlighted the eyes. Using an old cake makeup I rubbed it on to form the cheeks. I drew a simple mouth and eyelashes with a Sakura Micron Pigma pen.Using Americana Sealer I gave it a simple spray to seal paints.
I painted a large wooden head ball with acrylic flesh coloured paint,it dries very quickly and i dip dotted the eyes using the handle end of a paintbrush dipped into black paint .When the black was dry I dipped a thinner paintbrush handle into white paint and highlighted the eyes. Using an old cake makeup I rubbed it on to form the cheeks. I drew a simple mouth and eyelashes with a Sakura Micron Pigma pen.Using Americana Sealer I gave it a simple spray to seal paints.
The fabric was from my stash, I ripped a strip of fabric and put running stitches along the long edge and gathered the stitches tightly joining at the back to make a skirt.. Then i threaded a few buttons on to embroidery thread to imitate arms.
I used my glue gun to glue the fabric to the jar lid.
Laying the embroidery thread across the fabric with buttons hanging down to look like arms. I then glued the head on to top.
To make the hair I cut a bundle of wool and tied it in the centre and glued it to top of head with glue gun.
Adding a few buttons to the turned back brim of the hat, I then glued the hat on the head.
Simple, but it makes me smile when i look at it.
I might make a family of them.
We sell the hats and wooden beads in our store.
![]()
![]() I have always loved buttons and have been making them into dolls for years.Here are some button dolls that I had featured in Crafts Beautiful magazine in July 2001, yes 11 years ago.
I have always loved buttons and have been making them into dolls for years.Here are some button dolls that I had featured in Crafts Beautiful magazine in July 2001, yes 11 years ago.

The fabric was from my stash, I ripped a strip of fabric and put running stitches along the long edge and gathered the stitches tightly joining at the back to make a skirt.. Then i threaded a few buttons on to embroidery thread to imitate arms.
I used my glue gun to glue the fabric to the jar lid.
Laying the embroidery thread across the fabric with buttons hanging down to look like arms. I then glued the head on to top.
To make the hair I cut a bundle of wool and tied it in the centre and glued it to top of head with glue gun.
Adding a few buttons to the turned back brim of the hat, I then glued the hat on the head.
Simple, but it makes me smile when i look at it.
I might make a family of them.
We sell the hats and wooden beads in our store.


Subscribe to:
Posts (Atom)